Thinking about shortening your driver shaft for better control and accuracy? You’re not alone. Many golfers, especially those struggling with slicing or hooking, find that a shorter driver shaft can significantly improve their game.
By reducing the shaft length from the standard 45.75 inches to around 44.5 inches, you can achieve better dispersion and potentially even increase your distance by making more consistent center contact.
Before you grab your tools, it’s essential to understand the impact this change will have on your swing dynamics. Shortening the shaft by 1.25 inches not only affects the total club length but also alters the swing weight and feel of your driver.
While this modification is generally irreversible, the benefits often outweigh the risks, offering a more controlled and accurate shot. Ready to transform your game? Let’s dive into the details of how to shorten your driver shaft effectively.
How to Shorten Your Driver Shaft
To successfully shorten your driver shaft, gather specific tools and materials. This preparation ensures accuracy and safety during the modification process.
Required Tools
- Hacksaw or Rotary Cutter: For cutting the shaft to the desired length.
- Measuring Tape: To measure the precise length before cutting.
- Utility Knife: To remove the grip.
- Sanding Tool: For smoothing the cut end of the shaft.
- Epoxy Glue: To reattach the grip securely.
- Lead Tape: To adjust the swing weight post-modification.
- Grip Solvent: Facilitates the installation of the new or original grip.
- Vice with Shaft Clamp: Holds the shaft steady during the cutting process.
- Safety Glasses: Protect your eyes from debris during cutting.
- Work Gloves: Ensure a secure grip on tools and protect your hands.
- Dust Mask: Prevents inhalation of fine particles when cutting and sanding.
- Protective Clothing: Shields your skin from potential hazards during the process.
Step-by-Step Guide to Shortening the Driver Shaft
Follow these detailed instructions to shorten your driver shaft, ensuring precision and safety.
Measuring the Current Shaft
Determine the current length of your driver shaft using a measuring tape, starting from the sole of the club head to the end of the grip. Confirm the measurements twice for accuracy.
Knowing the starting length allows you to decide how much to shorten. When choosing the amount to cut, consider your swing style and desired ball flight.
Mark the shaft at your intended cut point, ensuring a clean, straight line. Use a specialized club saw for precise trimming. After cutting, smooth the shaft’s edge with fine-grit sandpaper to prevent any splintering.
Reattach the club head, ensuring a secure fit. Finally, regrip your club and verify the new length before hitting the course.
Marking the Cut Point
Use masking tape to mark the exact point where you plan to cut. Ensure the measurement aligns with your desired new length.
A clear, precise mark helps avoid mistakes during the cutting process. Double-check the location of the cut mark. Once you’ve confirmed the mark, secure the shaft in a vise with protective padding to prevent damage.
Use a hacksaw or a rotary cutter to make the cut. Ensure the cut is straight and smooth. After cutting, use fine-grit sandpaper to smooth any rough edges.
This will help maintain the integrity of the shaft and ensure a snug fit when reattaching the clubhead. Finally, attach the new grip and allow it to set properly before testing your newly shortened driver on the course.
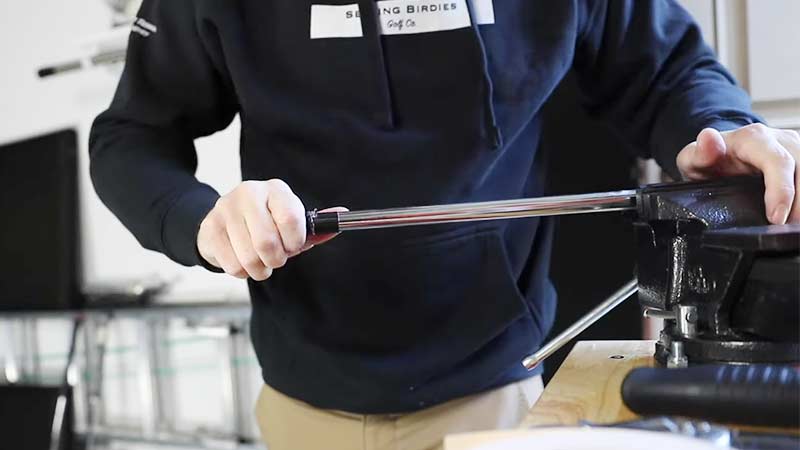
Securing the Shaft for Cutting
Place the shaft in a vise, ensuring it’s well-protected by a rubber clamp or similar protective material to prevent damage.
The grip and head must be securely tightened to maintain stability during the cut. Position the cut line just above the vise to allow a clean cut without obstruction.
Use a fine-toothed hacksaw to perform the cut smoothly. After cutting, smooth the cut end with a metal file to remove any burrs.
Once satisfied, reattach the grip and return the clubhead to its original position. Finally, ensure the club’s length is suitable for your stance and swing before taking it for a test drive.
Cutting the Driver Shaft
Shortening your driver shaft can enhance your golfing performance. Follow these precise steps for a safe and effective modification.
Safety Precautions While Cutting
Safety is paramount when cutting your driver shaft. Wear safety goggles to protect your eyes from any flying debris and gloves to prevent injury to your hands.
Ensure you work in a well-ventilated area to avoid inhalation hazards. Secure your workspace to prevent any movement during the cutting process.
Use a proper measuring tool to determine the correct length to cut off, ensuring it aligns with your desired specifications. A fine-toothed hacksaw or a specialized shaft cutting tool will yield the best results.
Techniques for a Clean Cut
For a clean cut, follow these steps meticulously:
Mark the Cut Point
Use masking tape to mark the exact point on the shaft where you want to cut. The tape helps in preventing the graphite or steel from splintering.
Using a hacksaw or a specialized shaft cutter, carefully cut along the marked line. Ensure you maintain a steady hand to achieve a clean, precise cut. After cutting, gently sand the edges to remove any burrs.
Secure the Shaft
Place the driver shaft firmly in a vise, ensuring it is immobile to achieve precision. Next, measure the desired new length from the clubhead end, marking it clearly. Carefully use a hacksaw or a rotary cutter to trim the shaft at the marked point, making a clean cut.
Once the shaft is cut, sand the end to remove any burrs for a smooth finish. Reattach the clubhead securely, ensuring alignment is correct. Lastly, test the club for balance and feel.
Use the Right Tool
Employ a fine-toothed hacksaw for cutting. Position the saw at the marked point, ensuring an angled cut. After the cut, smooth the edges with fine-grit sandpaper to prevent fraying.
Apply epoxy to the new end before reattaching the clubhead, ensuring a secure fit. Allow the epoxy to cure fully according to the manufacturer’s instructions for optimal strength. Once cured, inspect the club to confirm alignment and stability before your next round of golf.
Cut Slowly and Evenly
Apply steady pressure and cut slowly to maintain control and accuracy, ensuring a clean and even cut. After cutting the shaft, use sandpaper to smooth any rough edges.
Reattach the clubhead securely, ensuring proper alignment. Finally, test your modified driver on the range to ensure its performance.
After testing, make any necessary adjustments to fine-tune your swing. Remember, shorter driver shafts can improve control but might slightly decrease distance. Always consider professional advice if unsure.
Finishing Touches
After cutting your driver shaft to the desired length, ensure the finishing touches enhance performance and maintain safety.
Sanding the Cut Edge
Smooth the cut edge to prevent splinters and ensure a clean fit. Use fine-grit sandpaper, preferably 220-grit, to sand the edge.
Avoid applying too much pressure, which could damage the shaft material. Instead, hold the sandpaper firmly and move it in a circular motion around the cut edge until smooth. Proper sanding ensures the shaft end is free from rough spots, enhancing the grip attachment.
Once the sanding is complete, it’s crucial to apply a small amount of epoxy adhesive inside the grip to secure it firmly to the shaft. Slide the new or existing grip onto the shaft carefully, making sure it aligns perfectly with the clubface.
Allow the epoxy to cure according to the manufacturer’s instructions before using the club. Taking these careful steps ensures optimal performance and longevity for your newly shortened driver shaft.
Reattaching the Grip
Reattach the grip properly to maintain control and comfort. Apply double-sided grip tape around the shaft’s end before sliding the grip back on.
To ensure a secure fit, use grip solvent to make the tape slippery, allowing the grip to slide on easily. Align the grip with the clubface, paying attention to any alignment guides on the grip.
Let the grip dry thoroughly for at least 24 hours in a dry, well-ventilated area before using the driver. Properly reattaching the grip ensures your club feels balanced and performs optimally during swings.
Troubleshooting Common Issues
Shortening a driver shaft can be done for various reasons, such as improving control or adjusting the club to better fit your swing.
Here’s a guide on how to shorten your driver shaft along with troubleshooting common issues:
Shaft Fraying or Splitting
To prevent shaft fraying or splitting, ensure a clean and precise cut initially. Use a fine-tooth hacksaw or a specialized golf shaft cutting tool.
After cutting, sanding the cut edge helps remove any jagged pieces and minimizes the risk of splinters. Use 200-300 grit sandpaper, moving in circular motions around the edge.
If the shaft shows signs of splitting despite these precautions, epoxy may be applied to seal the edges, providing an extra layer of protection and durability.
Grip Alignment Problems
Proper grip alignment is crucial for maintaining your swing mechanics. Start by marking the desired alignment on the shaft before applying the grip.
Double-check the alignment as you slide the grip onto the shaft. A common issue arises if the grip twists during application.
Using grip tape with a uniform adhesive layer helps, but if misalignment occurs, remove the grip immediately and realign it before the adhesive fully sets.
To reduce future alignment issues, invest in a grip installation tool, which guarantees precise and consistent grip placement.
Testing Your Shortened Driver Shaft
Testing the newly shortened driver shaft ensures it performs as expected. Follow the steps below to adjust and analyze the performance of your driver.
Adjusting to the New Length
Practice swings with different grip positions to find the most comfortable setup. Test the club on the range to understand how the new length affects your swing mechanics and ball flight.
Initially, grip down slightly to see if the new shaft length provides better control. Maintain your usual swing tempo to prevent overcompensation for the shorter length.
After testing, take note of any changes in your accuracy and distance. If the modifications lead to improved performance, consider shortening the driver shaft permanently.
Remember to consult with a professional club fitter to ensure the changes align with your overall golfing technique and objectives.
Analyzing Performance Changes
Evaluate the dispersion and accuracy of your shots. A tightly grouped shot pattern and increased on-center hits indicate successful adaptation to the shorter shaft.
Track the distance metrics using a launch monitor to measure any changes. Compare the data against your previous configurations.
If the head feels too light, consider adding weight to maintain familiar swing weight and balance. For instance, add lead tape to the clubhead’s back if necessary. Monitor the shaft’s stiffness and adjust if it feels overly flexible by adding weight to the head or tip.
Frequently Asked Questions
Does shortening a shaft make it stiffer?
Yes, shortening a golf shaft can make it stiffer. This change can affect the club’s overall weight and swing weight, potentially altering its flex. Generally, for every inch you cut, the shaft becomes stiffer, which can nearly approximate a shift in flex.
Is it okay to cut down a driver’s shaft?
Yes, cutting down a driver’s shaft can improve control and accuracy, making it easier to make consistent contact in the center of the clubface. However, it may also change the club’s characteristics, such as swing weight and flex.
What happens to swing weight when you shorten the shaft?
Shortening the shaft typically reduces the swing weight. The general guideline is that for every half inch removed, the swing weight changes by three points. Adjusting the weight of the clubhead can help compensate for this change.
Can you cut a graphite shaft with a pipe cutter?
No, using a pipe cutter on a graphite shaft can damage it. Graphite shafts require particular care, and it’s recommended to use specialized tools to ensure a clean cut without compromising the integrity of the material.
Will a lighter grip increase swing speed?
Yes, a lighter grip can increase swing speed. The lighter weight can help create additional speed through impact, and the counter-balanced feel aids in squaring the face at impact more easily and consistently.
Conclusion
Shortening your driver shaft can significantly improve your game by enhancing control and accuracy. With the right tools and techniques, you can achieve a clean cut and ensure a proper fit.
Don’t forget the finishing touches like sanding the edge and reattaching the grip for optimal comfort. Testing the modified driver is essential to gauge its performance.
Pay attention to changes in dispersion, accuracy, and distance. Adjust your grip and monitor the shaft’s stiffness to maintain balance and performance.
By taking these steps, you’ll be well on your way to a more consistent and enjoyable golfing experience. Lastly, consider consulting with a professional club fitter if you’re uncertain about the modifications.
Their expertise can provide personalized adjustments, ensuring your driver suits your specific swing style and needs.


Colin McCarthy