You’ve been hitting the fairways like a pro, but suddenly, your trusty iron isn’t performing as it should. A loose golf club head can be a frustrating setback, especially when you’re in the middle of a great game.
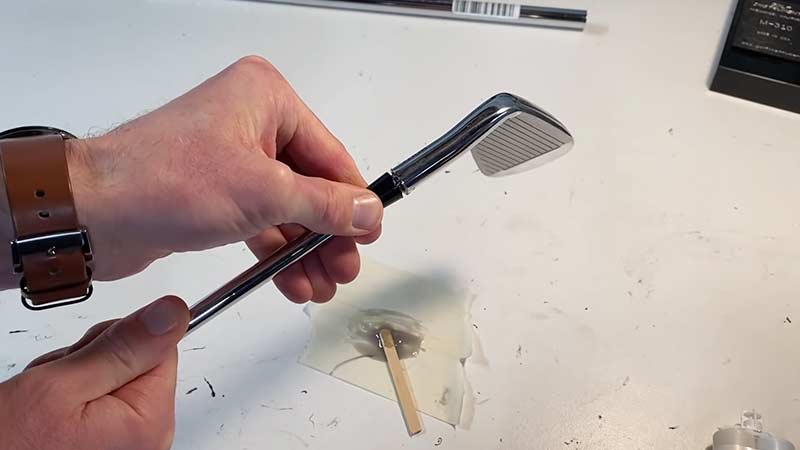
Fortunately, this common issue often has a simple solution that doesn’t require a trip to the pro shop. In many cases, the problem lies with the ferrule the small, usually plastic ring where the club head meets the shaft rather than the head itself.
If the head stays put when you swing, a dab of glue can often secure the ferrule back in place. Whether you’re dealing with a minor cosmetic issue or something more serious, understanding how to fix it can save you time and keep your game on track.
Materials Needed
Ensure you gather the necessary materials before starting the repair process. Proper preparation leads to a smoother and more efficient fix.
Types of Golf Club Heads
Identify the type of golf club head requiring attention.
Club heads fall into three main categories:
- Wood Heads: Often used for long-distance hits. Include drivers and fairway woods.
- Iron Heads: Typically used for approach shots and come in various designs, including cavity back and muscle back.
- Hybrid Heads: Combine features of both woods and irons, providing versatility for varied playing conditions.
Essential Tools and Supplies
Obtain these tools and supplies to fix a loose golf club head:
- Epoxy Adhesive: Provides a strong and durable bond. Ideal for securing golf club heads.
- Double-Sided Grip Tape: Necessary for re-gripping the shaft if required.
- Protective Gloves: Essential for protecting your hands during the repair process.
- Sandpaper or Grinder: Used to clean and prepare the surfaces before applying adhesive.
- Ferrule: A small plastic ring that fits where the club head meets the shaft.
- Shaft Clamp: Holds the shaft steady while the adhesive cures.
- Acetone: For cleaning surfaces and removing old adhesive.
- Mixing Stick and Container: To mix the epoxy adhesive accurately.
Step-by-Step Guide to Fixing a Loose Golf Club Head
To fix a loose golf club head, follow these steps:
Assessing the Damage
Determine if the problem lies with the ferrule or the club head. Hold the grip and try to twist the head; if it twists, the head is loose, otherwise, it is likely the ferrule.
Confirm the type of issue to apply the correct fix. If the club head is loose, it can often be fixed by re-gluing it. For a ferrule issue, simply push it back into place or replace it if damaged. Always ensure proper alignment and secure fastening.
Additionally, check for any cracks or damage on the club head that may require professional repair. Regular maintenance can prevent these issues. By addressing problems promptly, you can extend the life of your golf clubs.
Preparing the Golf Club Head and Shaft
Gather essential tools and supplies: epoxy, sandpaper, and a clean cloth. Remove any dirt or debris from the head and shaft.
Sand the tip of the shaft and the inside of the head socket to create a rough surface for better adhesion. Apply a small amount of epoxy to both surfaces, ensuring even coverage. Insert the shaft into the head socket and align it properly.
Allow the epoxy to cure according to the manufacturer’s instructions. Wipe off any excess epoxy that may have seeped out.
It’s crucial to ensure that the club remains undisturbed during the curing process to secure a strong bond. Once completely cured, inspect the club for stability and reassemble with the grip if necessary.
Applying Golf Club Epoxy
Mix the epoxy according to the manufacturer’s instructions. Apply a thin, even layer of epoxy to the tip of the shaft and inside the club head socket.
Ensure complete coverage to avoid gaps and ensure a strong bond. Insert the shaft into the club head socket, aligning it correctly.
Wipe off any excess epoxy immediately. Allow the club to cure as per the epoxy’s recommended drying time before using it.
To ensure the best results, it’s crucial to clamp the club securely during the curing process. Double-check that the alignment remains unchanged.
After the epoxy has fully cured, inspect the joint for any weaknesses. If all looks good, your club is ready for a test swing. Remember, patience is key to a durable repair.
Securing the Head to the Shaft
Insert the shaft into the club head socket while twisting it slightly to spread the epoxy evenly. Align the head properly and ensure there is no excess resin spilling out.
Wipe off any excess epoxy with a clean cloth before it dries. After ensuring a clean fit, allow the club to rest undisturbed for at least 24 hours so the epoxy can fully cure.
Once cured, thoroughly inspect the club head to confirm a secure and stable attachment. Reattach the grip if it was removed during the process.
Finally, take the club out for a few test swings to make sure everything feels aligned and stable. Proper maintenance will prolong the life of your club.
Curing the Epoxy
Allow the epoxy to cure and harden as recommended by the manufacturer, typically 24 hours. Place the club in a stable position to ensure the head remains aligned during the curing process.
Perform a final check after curing to ensure the head is securely attached and ready for use. Consider re-gripping the club if necessary, as a solid grip complements a fixed head.
Finally, test your club on the range to ensure optimal performance. Proper maintenance extends your club’s lifespan. Perform a final check after curing to ensure the head is securely attached and ready for use.
Finishing Touches
The final steps ensure your club looks and performs its best. Proper sanding and polishing, followed by reattaching the grip, complete the repair process.
Sanding and Polishing
Ensure the ferrule and adjoining areas blend seamlessly with the club shaft. Use fine-grit sandpaper to smooth any rough edges from the epoxy work.
Sand the areas applied with epoxy until they feel even and blend with the original finish. If the ferrule was glued, ensure that any excess adhesive is removed.
Follow up with a polishing cloth to restore the club’s natural shine. This enhances the aesthetic appeal and ensures a professional finish.
Reattaching the Grip
Apply double-sided grip tape neatly along the club shaft. Leave a 0.5-inch overhang to tuck inside the shaft. Smooth any air bubbles for a snug fit.
Pour grip solvent into the new grip until it is one-third full. Shake to coat the interior evenly, then pour excess solvent over the taped shaft.
Align the new grip with the clubface and swiftly push it down the shaft. Position the markings straight before the solvent sets. Allow the grip to dry for at least 24 hours to ensure its stability.
Troubleshooting Common Issues
To troubleshoot common issues with golf club heads, follow these steps:
Golf Club Head Still Loose After Repair
If the golf club head remains loose after repair, the epoxy bond may not be strong. Ensure the surfaces of the head and shaft were clean and free of debris before applying the epoxy.
Check for any residual glue or dirt that could have compromised the bond. Use fine-grit sandpaper to clean the surfaces again, then reapply a generous but controlled amount of epoxy.
Hold the club head and shaft firmly together for at least the first 10 minutes to ensure a secure bond. If the head still feels loose, the shaft might need replacement due to structural weakening over time.
Issues with Epoxy Not Setting
When epoxy fails to set correctly, the curing conditions might be the issue. Ensure the temperature is between 70°F and 90°F, as lower temperatures can hind the curing process.
Mix the epoxy components thoroughly in a one-to-one ratio, ensuring no streaks remain in the mixture. Also, examine the expiration date on the epoxy product; expired epoxy might not set properly.
Allow the epoxy to cure undisturbed for at least 24 hours to ensure full strength and bond integrity. If problems persist, consider using a high-strength, quick-setting epoxy specifically designed for golf clubs.
Conclusion
Fixing a loose golf club head can be simple and cost-effective. First, determine if the issue is with the ferrule or the head. For a loose ferrule, apply a small amount of glue.
If the head is loose, gather materials such as epoxy, sandpaper, and a vise. Clean and roughen the surfaces, apply the epoxy evenly, and assemble the shaft and head, ensuring proper alignment.
Secure the club in a vise and allow the epoxy to cure fully before use. Using high-quality materials and proper techniques ensures a durable repair.
After the epoxy has cured, inspect the club to ensure the head is firmly attached. Test it with a few gentle swings to confirm stability. If properly executed, your golf club should perform like new.


Colin McCarthy