A damaged ferrule on your golf club can impact your swing and performance. This guide provides steps to repair or replace a ferrule using common household tools: a utility knife, a file, epoxy adhesive, and a replacement ferrule.
Remove the old ferrule, clean the shaft, apply epoxy to the new ferrule, and slide it onto the shaft. Let the adhesive cure, then test the club to ensure stability. Regular maintenance can extend your equipment’s life and enhance your game.
For more tips, subscribe to our newsletter. Stay informed to keep your gear in top condition and your skills sharp.
Follow these steps to keep your clubs in optimal shape and continually improve your performance on the course. For additional guidance, explore our detailed tutorials and expert advice featured in our blog.
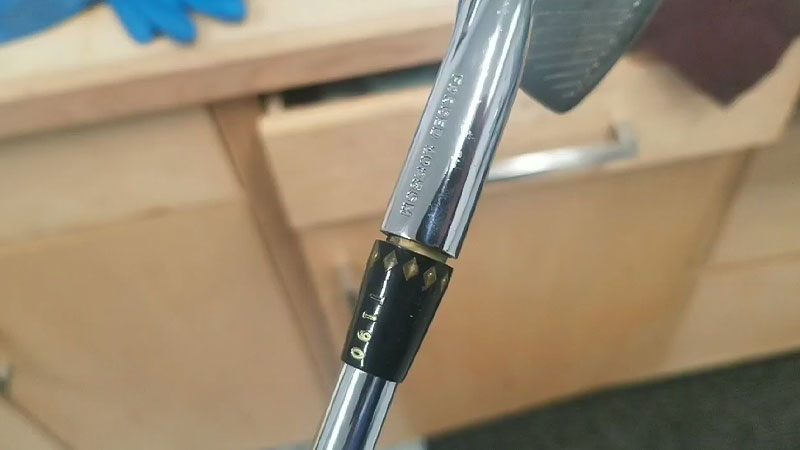
Understanding the Ferrule
The ferrule is an essential yet often overlooked part of a golf club, positioned just above the clubhead to protect the joint between the shaft and clubhead.
Its condition can affect swing consistency, with a damaged or loose ferrule leading to imbalanced and inconsistent shots. Ferrules come in various shapes and sizes, so selecting the right one is crucial for a secure fit.
A well-maintained ferrule also improves the club’s appearance and performance. To replace a ferrule, remove the old one with a heat gun and pliers, clean the shaft, apply epoxy resin, install the new ferrule, and smooth any rough edges with fine-grit sandpaper for a professional finish.
Tools and Materials Needed
To fix a ferrule on a golf club, gather tools such as a new ferrule, epoxy adhesive, a ferrule setting tool, a heat gun, grip solvent, sandpaper, a caliper, and a vise.
First, use the heat gun to soften the adhesive of the old ferrule and tap it off with the setting tool. Clean the shaft with grip solvent and sandpaper, then measure it with a caliper to ensure the correct ferrule size.
Apply epoxy adhesive inside the new ferrule, slide it onto the shaft snugly, and secure the club in a vise to allow the adhesive to cure. Once dry, the ferrule should be well-aligned and fixed.
Step-by-Step Guide to fix a ferrule on a golf club
Maintaining the ferrule on a golf club ensures optimal performance. Follow this step-by-step guide to fix a ferrule on your golf club.
Step 1: Prepare Your Work Space
Set up on a sturdy table or bench. Ensure you have all tools and materials, including epoxy adhesive, a ferrule setting tool, a heat gun, grip solvent, sandpaper, a caliper, and a vise. Good lighting helps you see details clearly.
Begin by heating the old ferrule with the heat gun to loosen it, then gently remove it using pliers. Clean the shaft thoroughly with sandpaper before applying epoxy adhesive and setting the new ferrule in place.
Step 2: Apply Heat to the Old Ferrule
Warm the old ferrule with a heat gun, moving it back and forth to avoid damaging the shaft. After a few seconds, use pliers to slide the softened ferrule off.
Clean the exposed area thoroughly before installing a new ferrule. Choose a ferrule matching the club shaft size, slide it into place, and use a pressing tool to secure it. Reheat the new ferrule to ensure proper bonding.
Step 3: Remove the Old Ferrule
Use a ferrule cutting tool to slice the old ferrule gently. Don’t press too hard to avoid scratching the shaft. Slide the old ferrule off once it’s split.
Clean any residue left on the shaft with fine-grit sandpaper. Next, apply a small amount of epoxy to the new ferrule and slide it onto the shaft. Allow it to cure completely before using the club.
Step 4: Clean the Hosel
Clean the hosel using grip solvent. Wipe away any debris or old adhesive. Ensure the hosel is completely dry before proceeding.
Apply a small amount of epoxy inside the cleaned hosel. Insert the shaft into the hosel, ensuring it is aligned correctly. Allow the epoxy to cure completely according to the manufacturer’s instructions.
Step 5: Install the New Ferrule
Slide the new ferrule onto the shaft. Use a vise to hold the club securely. Push the ferrule down until it reaches the hosel. Make sure it’s snug and aligned properly.
Apply epoxy to secure the ferrule. Let it cure for 24 hours. Finally, use fine-grit sandpaper to smooth any rough edges for a polished finish. Double-check the alignment before proceeding to the next step.
This ensures longevity and performance. Inspect the club thoroughly to ensure the repair is complete. Enjoy improved durability and play.
Step 6: Secure the New Ferrule
Mix and apply epoxy adhesive inside the ferrule. Twist the ferrule slightly to spread the adhesive. Let it cure according to the adhesive instructions. Once the adhesive has fully cured, check for any excess epoxy and clean it off with a solvent.
Finally, polish the ferrule to restore its shine and ensure it’s securely in place. If necessary, use fine-grit sandpaper to smooth any rough edges. Reassemble the club head, ensuring it fits snugly with the reattached ferrule.
Step 7: Add Final Touches
Sandpaper the ferrule lightly to ensure a smooth finish. Wipe off any excess adhesive. Double-check the ferrule’s position and alignment.
Your golf club is now ready for the next game with a securely fixed ferrule. Your golf club is now ready for the next game with a securely fixed ferrule.
If you encounter any issues, consider consulting a professional or reviewing more detailed guides. Enjoy your game!
Alternate Methods
There are several methods to remove a ferrule from a golf club: using a heat gun to gently loosen it, employing a ferrule extraction tool to twist and pull it off, or carefully cutting along the ferrule’s length with a hobby knife and prying it open.
Combining these methods can increase efficiency and reduce the risk of damage. To install a new ferrule, apply.
A small amount of epoxy inside the ferrule, slide it onto the shaft for a snug fit, align it with the club head, and let the epoxy cure fully according to the manufacturer’s instructions for a durable and high-performing golf club.
Frequently Asked Questions
How to adjust the ferrule on a golf club?
To adjust the ferrule on a golf club, align it with the shaft and ensure it sits flush against the clubhead. Make any necessary angle adjustments for a consistent taper and a professional finish.
Does a loose ferrule affect a golf club?
Yes, a loose ferrule can affect a golf club by causing instability at the connection point between the shaft and clubhead, potentially impacting swing consistency and performance.
How do I know what size ferrule I need?
To determine the correct ferrule size, measure the diameter of the shaft where it connects to the clubhead. Use a ferrule with the same diameter for a proper fit.
How to remove a golf ferrule?
Heat the ferrule and hosel gently using a heat gun. Then, carefully cut the ferrule parallel to the shaft with a utility knife or use a ferrule extraction tool to remove it without damaging the club fibers.
Can golf irons be repaired?
Yes, golf irons can be repaired. Repair options include replacing parts, adjusting the loft and lie, and refurbishing the club to restore its appearance and functionality.
Conclusion
Maintaining the ferrule on your golf club is crucial for ensuring optimal performance and protecting the connection point between the shaft and clubhead.
By following the detailed steps provided, you can effectively fix a damaged ferrule and improve your swing consistency.
Whether you choose to use a heat gun, a ferrule extraction tool, or a hobby knife for removal, combining these methods can enhance efficiency and reduce the risk to your club.
With a well-maintained ferrule, your golf club will be ready for your next game, ensuring you play your best. Don’t forget to regularly check the ferrule for signs of wear or damage to prevent any future issues.
Consistent maintenance can greatly extend the lifespan of your equipment and enhance overall performance.
If you’re unsure about performing these repairs yourself, consider consulting a professional to avoid potential mishaps. Investing time in proper maintenance pays off on the course. Happy golfing!


Colin McCarthy